By Pauline Weston Thomas for Fashion-Era.com Copyright 2003+
How to Make a Pareo That Doubles as a Zorro Cape
Back to main sectionWhat is a Pareo?
A Pareo is almost the simplest of capes to make. It is a long length of wool fabric about 70 to 80 inches made from 60 inch wide cloth that is slit and very lightly shaped part way up the centre fold. This is an item that might get an airing once a year or so when you are seeking a cover up for a difficult to cover evening dress to take you from car to door, but when a pashmina is simply too lightweight. It is also perfect for fancy dress to add a touch of mystery. My sister and I have always jokingly referred to pareos as Zorro capes, and they are dramatic when made in black material. They would also be ideal as fast to make capes for a drama production. This is because the fabric is preserved in almost its whole state, so the item might be re-cut into another garment for another play or musical at a later date.The Pareo Diagrams
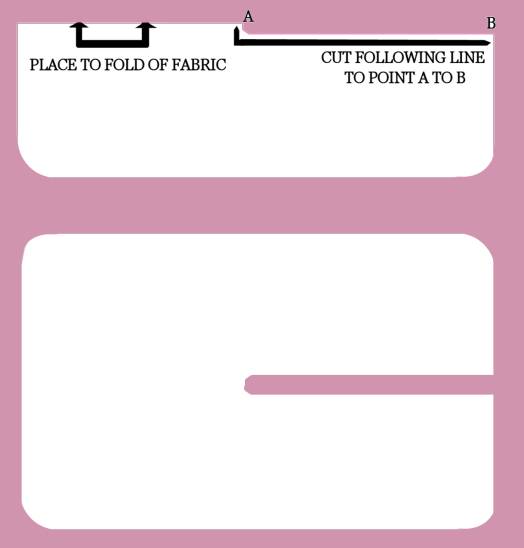
This item is so easy to make that I provide a simple pattern on this page, with or without curved edges. Click either thumbnails for an enlargement.The Pareo Diagrams
Square Corner Version Use 60 inch wide or 72 inch wide fabric placed on the fold of fabric, but see note below about fabric length measurements.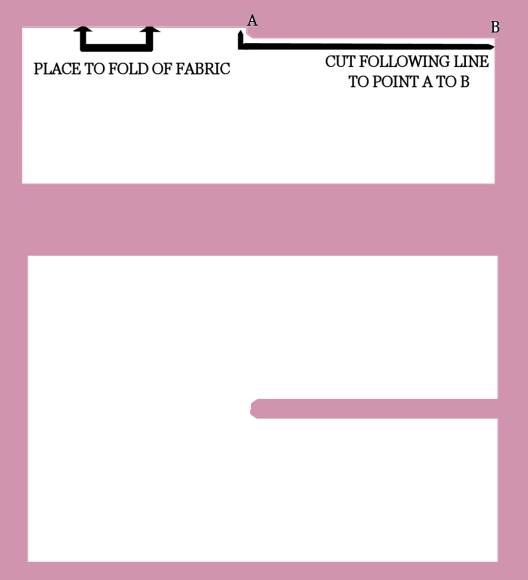
The length of fabric you buy should be altered according to the height of an individual, with a shorter person needing a few inches less fabric and a taller person perhaps preferring more. In general make sure your 60 inch or more wide remnant, is at least 75 inches in length, before edges are turned for a woman about 5ft 4 inches tall. For a 6 inch taller woman you can add another 12 inches fabric to your purchase as of course the fabric figure is halved when the pareo is on the body. If you use much less than 70 inches length you will feel you do not have enough fabric to swing one flap over the shoulder with a flourish.
But this is a garment that is so easy to take a risk on, by using a great remnant buy of a length of wool that might seem too little material for a good jacket. By simply draping a bath towel over your shoulder you can get an idea of what half of a pareo might look like when you swing the front half up over your shoulder. You should be able to make this simple item in an hour or two dependant on ability and experience. The more careful you are with making it the longer it will take.
Simple Written Instructions on How to Make the Pareo
- Ideally pareos are made unlined, from cashmere or cashmere and wool mix material, high quality soft wool Melton cloth, mohair or from silk velvet if lined. Knit fabric and knitted yarn versions can also be made. People who machine knit can make woven pieces or felt long knitted pieces as boiled wool. Pareos are simpler to make than even a cloak.
- Using the pattern guide above you can cut the pareo out directly from the folded cloth using a metre rule or yardstick and some dressmakers chalk. Use a dinner plate or paper circular guide to get nice curved corners. Next press out the centre fold using steam on the wrong side of the material using a steam iron and a muslin cloth. If the crease is stubborn then dampen your muslin cloth and wring out the excess moisture.
- Clip lightly around the neck edge every centimetre or half inch or so, to ensure the hem will later lay flat. If you chose to make curved corners rather than square ones you will also need to clip those gently. Try this technique out on a scrap of fabric if you are inexperienced at sewing. At this stage I prefer to press under the complete perimeter of the edges for half an inch or so all around using the iron and a muslin cloth. This will help reduce zig zag or overlock thread markings showing through if you press too heavily after stitching. This is such a simple item to make that taking care at this stage is well worthwhile.
- Now finish the cut edges in a variety of ways. Either over lock or zigzag the raw edges with matching thread and then turn under about half an inch of material to the wrong side if you did not already press it into position.
- Use a medium straight stitch and a size 16 (100) needle or a jeans needle to machine stitch the hem down. Use a scrap first to check you like the tension of the stitching.
- If you don't have a machine go ethnic and loop (blanket) stitch the edges with wool either matching or contrasting using a pointed tapestry needle. Black, ecru, red and creamy white wool all make good effects around black wool. Or do a reverse hem and press the edge to the visible outside of the fabric and then hand stitch one inch wool braid or similar over the top to cover the raw edge.
- Sometimes pareos are finished with a braid edge, especially when made of lined velvet fabric. They can be left loose or have a decorative frog fastening or other clasp, but if in fashion, a brooch might suffice to hold the garment together on a chill evening.
- Simple instructions - To make the pareo some sewing ability would be useful, but for fancy dress or a 3 show production even raw edges would be permissible. If you haven't sewn before try pressing the scraps and testing the stitching on the scraps first. If it is really for a throwaway fancy dress event you can even use a PVA fabric glue like Copydex to apply fringe or bobbles quickly.
- When the pareo is finished, drape it around a sturdy well balanced heavy coat hanger, inside out. Wait to put it away the following day when all pressing moisture has dried out of it naturally otherwise it will get set creases. This can also be stored flat with a few folds like a bolt of fabric. This also is an easy to pack garment easily folded into 3 for a large suitcase.
