Ancient Egyptian Clothing History -Skirt, Cape and Draped Shawl Styles
By Pauline Weston Thomas for Fashion-Era.com
- The Petticoat and Cape
- Shawl Cape
- Fourth Style Draped Shawl Styles
- Egyptian Costume Draped Shawl Style Garment
- Instructions for Draping
- Instructions for Draping Model S
- Instructions for Draping Model T
- Instructions for Draping Model U
- Instructions for Draping Model V
Third Style - Skirts & Capes
The Petticoat Skirt and Cape
 After the tunic and the robe, came the third style of Egyptian dress, the petticoat skirt with cape shawl.
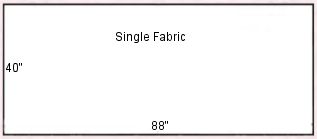
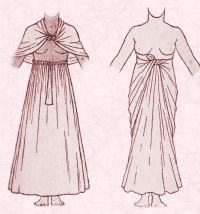
The petticoat skirt was a straight piece of material threaded through at the waist to keep the garment in position. The style could be worn with a cape as shown on the model.
How to make the ancient Egyptian shawl cape is shown below.
The length of fabric could also be worn as a skirt wrapped, passed around the body and then tied it at the front. As you can see, without a cape this costume is much more more revealing, although is was very suited to the hot Egyptian climate. Sometimes a decorative collar would be worn with this ancient Egyptian clothing style.
Shawl Cape
The cape shoulder drapery was a rectangle twisted in specific manner as shown in the diagram. Once the ends were twisted, they could be knotted to make ties, which then used to position the cape. The triangle at points a), b) and c) was twisted at a) until it made a short compact length that could be used as a cord tie.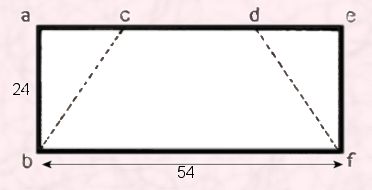
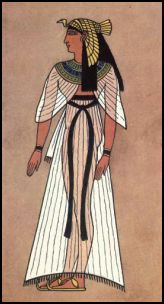
A deep ornamental collar could be worn over the cape.
Decoration in Egyptian dress was mostly on the collar. The patterns used were made with either beads, jewels or embroidery. Painting designs directly onto the collar was also used. Sometimes collars were made from coloured pieces of leather.
Fourth Style - Draped Shawl Styles
Egyptian Costume Draped Shawl Style Garment

The last type of Egyptian Costume is the Shawl Draped Style and its variations. These styles have a strong resemblance to Indian sari styles of today. Their beauty lies in draping a simple rectangle of usually bordered fabric, in an artistic and ingenious manner.
The best Egyptian costumes radiate draperies emanating from one main point - the knot. Many of you will be familiar with aspects of this technique from tying a beach sarong. From that experience you will realise that the softness, or the stiffness, creates a different final look.
Also sometimes just moving the position of the fabric length a few inches, makes it look more Egyptian.
Instructions for Draping
Prepare a fabric length as shown in the guideline below.
For fancy dress costumes, if you cannot sew well, then you will find it easy to purchase material in 45" wide lengths.
If you are taller, seek out 54" wide fabrics, even perhaps browsing the flowing sheers and semi sheer materials in the furnishing fabric departments.
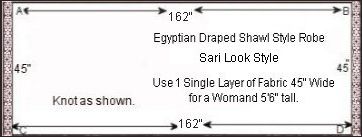 Models S) and T) below both use this pattern guide right.
Instructions for Draping Model S
Obtain your fabric length of 162" by 45" deep as shown right.
To drape the first style S below right, tie a cord around the waist.
Tuck in corner B) at the left side waist.
Pass the fabric around the back and then around the side again.
Make some pleats and tuck them in the centre front of the waist into the cord and fabric.
Next pass the remainder round to the back and side again.
Now catch up all the whole excess drapery of fabric.
Throw the drapery upwards from the right hand side of the waist under the left armpit.
Next pass it on around the back over the right shoulder towards the front body.
The remaining fabric should be thrown over the chest and then over the left shoulder.
Instructions for Draping Model T
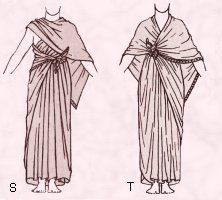
The model T, to the right, dates from ancient Egyptian clothing of 1300 B.C. To arrange model T use the same guideline fabric pattern with a fabric length of 162" by 45" deep.
Take the corner of A) and hold it at the right side waist at the front.
Next pass the fabric around the back, to the left side of the waist under the left arm, towards the front.
Now catch up the entire garment and throw the whole fabric length over the right shoulder.
Take the upper edge of the fabric and pass it around the back of the neck so that it falls over the right shoulder.
Position the fabric so it lays across the right chest. At that point corner B) should be tied to corner A). Corner D) should be hanging down the back in a point.
Instructions for Draping Model U
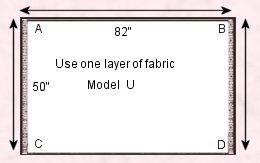
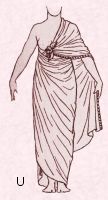
Model U dates from 1600 B.C. and uses the narrower fabric guide right. Since the costume is more exposed less material is needed.
Note the fabric is 5" deeper at 50", since it is drawn up higher more quickly, so you may need to purchase furnishing fabric at 54" or 60" wide dress fabric.
Take hold of corner A) and position it at the right side of the front waist.
Take the long edge A) to B) around the back of the waist across the front towards the left side.
Next pass it around the the right side again and under the right arm.
Now pass it towards the back and then upwards over the left shoulder.
Finally tie corner A) to corner B).
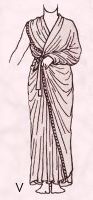
Instructions for Draping Model V
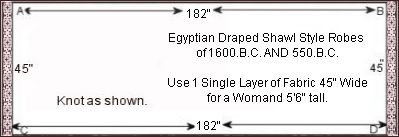
Model V is a late Egyptian clothing style and dates from 500 B.C. This model demands another guide pattern 20 inches wider at 182" wide by 45" deep. (I'd buy 5 yards or 5 metres of 45" fabric for this style - it's usual to get cut an extra inch or two over a purchase of several yards.)
N.B. - You will need a cord or woven tape some inches longer than your waist, plus a decorative girdle of the sort worn over a gymslip - and which might be made of ribbon.
 As in version S), tie a cord around the waist.
Using the same fabric length take corner A) start by holding it at the waist on the left side.
Now holding the corner A) firmly in that position throw all the fabric up over the right shoulder to the back.
Now take corner C) and bring that around under the right arm and hold it along with corner A).
The edge of the long side A) to B) still hangs over the right shoulder.
Now draw that edge downwards across the back to the left side of the waist.
Bring it around to the front of the waist and at the left front side waist pin it to the corners A) and C).
Then pass the garment on round the front and tuck in a few pleats at the centre front into the waist cord.
Next pass it around the right side of the waist and upwards across the back taking it over the left shoulder.
Then see that it passes over the chest toward the right side of the waist.
At this point check the image of Model V and see how you need to pass a loop of fabric over the left wrist.
Finally tie the whole drapery at the waist with a separate girdle.
Read more on Egyptian makeup.
Source
This page contains ancient Egyptian clothing plates sourced from the book Ancient Egyptian, Assyrian and Persian Costumes & Decorations by Mary G. Houston and Florence S. Hornblower. The book was published by A & C. Black of London in 1920. F. S. Hornblower coloured both the figures and Decorative Ornament plates where colour was needed.
Page Added 15 Nov 2007. Ref:-P660
You have been reading an original costume history article by Pauline Weston Thomas at www.fashion-era.com ©